The
Laymens Guide To
Virtual Reality
Motion
Flight
Simulators
Copyright © 1997 - 2023 Ken Hill
CHAPTER THREE - THE COMPUTER CONNECTION
COMPONENTS
The components needed to effectively integrate your JoyRider motion platform with your computer flight simulations are as follows:
Joystick Motion
Integrate joystick potentiometers with motion of cockpit to send data stream to computer.
Joystick buttons/controls
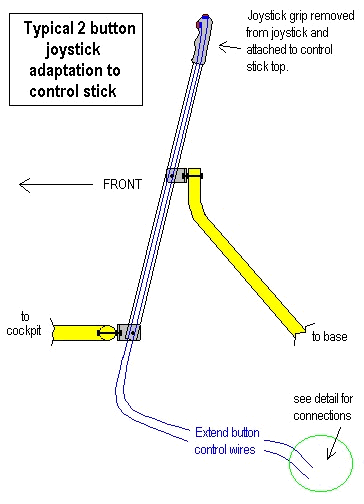
Integrate the grip of your joystick onto the control stick of the platform and extend wires to reconnect to joystick base and then on to the computer connections.
Rudder pedals
Mount off-the-shelf unit to foot rest of platform - extend cockpit framing for support if necessary.
Throttle
Mount to cockpit side - Be sure to allow maximum width between knees for stick roll movement.
CONTROL CONNECTION
To avoid confusion, we'll refer to a joystick as joystick and the control stick in the JoyRider cockpit as the control stick. Joystick base is a joystick without it's handle, and handle is the joysticks grip complete with buttons, triggers, etc. removed from the joystick. "Pot" is short for potentiometer, a volume control type electronic component inside a joysticks base that changes its electronic signal to the computer to determine joystick position. You will also hear them called variometers.
The idea for the pitch and roll controls is to have the cockpit motion move joystick pots in the same way as the stick on your standard joystick does to the pots in its joysticks base.
If you are a mechanical wiz, you could rig pots directly to mechanical linkage to a number of locations on the platform; at the bearings, at the control stick, to the seat, etc. For that matter, you could make your own rudder pedals and throttle the same way. Plans are available on our host site FINAL APPROACH (Note: Don't use the link to this site from Final Approach as it has long ago been abandoned.)
If you want to keep it simple, either find an old joystick that works good or buy a decent one just for the base. We adapted two old sticks. We used one that was shot just for the grip, and one that worked but was only a one button model with a stubby stick for the base. Don't just cut off the handle, disassemble it and keep the parts intact. Each joystick is different in construction, but generally the handle comes off in two halves. These can be carved out if needed to accept a larger post which can then fit in the control tube and be secured.
The logical place to mount the joystick base seemed at first near the control stick center where it pivots. This posed a number of problems with shortage of space, necessary linkages, etc.
We found that it was MUCH easier to mount the joystick base backward under the seat on the control stick support frame and connect it with light weight bungees or heavy elastic cord to the bottom of the seat bottom in four opposing directions. This type connection takes care of any excessive movement the cockpit does that the joystick mechanism can't follow without maxing out. It also has the advantage of compensating for the swing arc of the seat away from the stick base plane. This also reduces stick sensitivity at the extremes making for a well mannered control while still letting you get wild with the control stick. Actually, with the right tension bungee or elastic cord, you can just use two directions, side to side, with extension posts extending down from the sides of the seat. This allows up/down movement from the equal pulling of the side elastics on the stick post.

With the correct joystick base location, you can set trim, center and even a null zone by just adjusting the bungee tensions. You will need to extend the joystick base control post (if you've removed the handle). Experiment with its length to achieve full throw just before full movement of the platform. Adjust the bungees tight enough so at center all are even with just very slight tension.
WIRING
If you started with only one joystick and removed the handle, you can lengthen the wires from the buttons, triggers, etc. and run them down through the control stick tube and out the bottom. Leave extra slack for control stick movement and bundle and route them back to the joystick base under the seat. Reconnect them to the same locations they came from and you're in business. You may need to get a joystick extension cable to make it reach the computer.

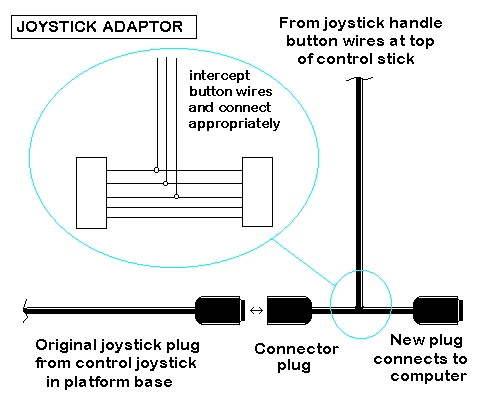
If you used the handle from one stick and another joystick for the base, then another option is to wire an adaptor plug that connects to the base joystick and intercepts the control button connections and exits to a standard joystick plug. No modifications are necessary to this joystick at all except the bungee connection and hold down straps or attachments.

DISPLAYS AND SUCH
Our prototype cockpit had additional framework for a monitor and keyboard.
Monitor
Advantages -
- Put extra old monitor to use.
- Keyboard handy for systems functions, set-ups and calibration.
Disadvantages -
- 30 plus pound monitor swinging around at break-neck speeds.
- Not much immersion factor from small screen.
- Best with lights out.
Head Mounted Display (HMD)
Advantages -
- VR headset is best choice for immersion.
- Blocks out all outside stimulus.
- 3D display with right software running.
- Head tracking.
Disadvantages -
- Expensive.
- Can't use a keyboard without lifting visor.
- Program incompatibilities.
- May need additional drivers to be loaded.
Projection
Advantages -
- Big screen with high res display.
- Can still use keyboard if needed.
- Projector can be mounted above and behind pilots head to help CG problems.
Disadvantages -
- Expensive.
- Needs large blank wall since projector moves with cockpit.
- Or screen needs to be mounted on cockpit.
- Needs light out.
- Needs VGA to TV convertor unless using LCD computer projector then VERY expensive.
Sony makes a lightweight TV projector that looks perfect. ATI makes video cards that have TV output. It's not known how bright the projector's output is however.