Build your own Wally Wing
by Ken Hill
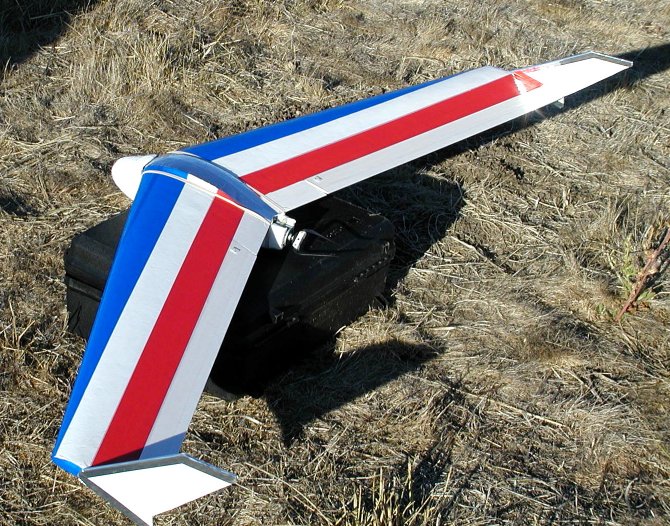
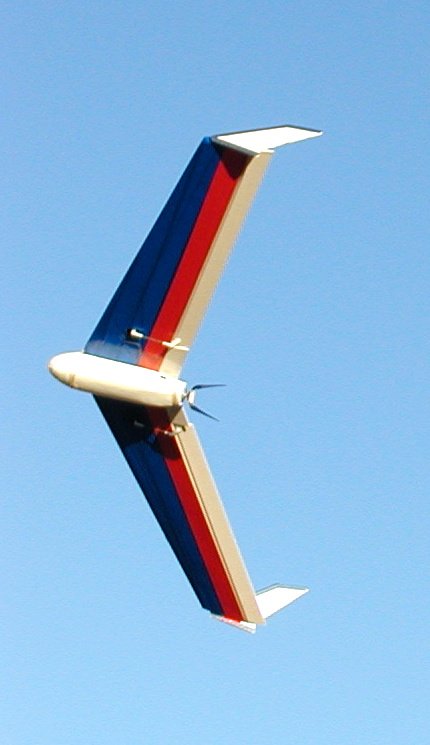
SPECS AS SHOWN
Wing span
- 53.5"
Area -
361 sq. in. (2.5 sq ft.)
RTF weight
- 23 oz. with RS 1600 NiMH 8 cell AA pack.
6vt. S400
powered
Kontronik
Rondo 400 15A ESC
6.3 x
3 Graupner CAM folding prop configured as a pusher.
Mixed
elevons for pitch & roll control.
First I want to thank all the great folks at Ezone!
Without the friendly helpful discussion group support there, this project would never exist and I'd still be in the dark about electric's ;)
Seasoned builder? By grabbing some numbers and glancing at some pics you should be able to get one in the air.
Intermediate builders will want to at least study some of the construction text and view the linked detailed pictures in more depth.
Beginning builders should read it all and study each picture up
close (click it) for the notes written on them.
Any construction methods that are new to you can be researched further in
most cases.
Try doing a search at Ezone for the subject of interest for starters.
Please read through all of the instructions before starting building.
This will give you a better overview to the entire project and may inspire
your own revisions to the construction.
It's better to understand what you'll be doing before you try to do it!
Tools: You could probably build a Wally with just a good pocket knife if you're an expert!
Most of us will want the usual assortment of building tools common around the shop.
Besides things like rulers, pencils, scissors, hobby knife, etc. you need the following:
* A straight, level, flat building surface (must have!)
* Band saw if available, a fine tooth wide blade hobby saw or hacksaw blade, or at least a serrated table knife.
* A Dremel tool w/ router attachment and 1/8" bit is highly recommended
but not required.
Supplies:
Strapping tape - preferably the criss-crossed fiber reinforced type.
* Covering - clear or colored packing tape or low-temp heat shrink covering (test apply to scrap foam first!)
* 5 to 15 minute epoxy
* wax paper
* 3M Super 77 spray adhesive (non acetone type)
* rubber bands
* nylon wire ties
* thin bamboo skewers
* 1/8" thick Corex or Coroplast corrugated plastic sheet
Parts:
* 2) 1/8" x 1/2" x about 28" spruce front spar
* 1) 1/8" x 1/2" x 19" spruce rear spar
* 2) 1/8" x 3/8" x about 28" spruce TE cap sticks
* 2) 1.5" x 3/8" x about 28" balsa tapered TE stock
* 1) set Dubro 1/2a control horns (preferred due to mounting hole pattern)
* 4) 2-56 clevises that fit your servo arms and horns
* 5" 2-56 threaded rod that fit clevises
Gear:
S-400 pusher gear w/ battery pack size of 1.25 inch square
3 channel radio w/ 2) mini servos (.5" thick max) with mixing or with mixer
added for elevons
(NOTE: ALL PICS LINK TO LARGER VERSION TO SEE DETAILS)
To get here:
You'll need to start here:
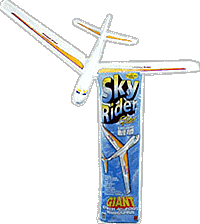
"Life Like Products" "Sky Rider" 4.5 ft. span foam hand toss glider
Available at Walmart (seasonal) and other department stores
or mail order from Tower Hobbies or direct from manufacturer.
INDEX
1) Wing - Preparation
2) Wing - Front Spar
3) Wing - Joining & TE caps
4) Wing - Rear Spar
5) Elevons
6) Fuse Pod
7) Reinforcement & Taping
8) Motor, Radio, Controls, Wingtips
9) Flying
BACK HOME